Bringing the DeepMoji neural net to iOS with Core ML (Part 1)
This post is the first of two parts, which will cover converting an existing Keras neural network containing custom layers into a Core ML model.
Accurately understanding the emotional valence of a piece of text is critical for a language processing system to properly understand its meaning. I recently discovered DeepMoji, an intriguing deep learning model for analyzing sentiment, emotion, and sarcasm in text.
DeepMoji is a model trained on 1.2 billion tweets with emojis to understand how language is used to express emotions. Through transfer learning the model can obtain state-of-the-art performance on many emotion-related text modeling tasks.
I encourage the reader to check out the original paper for details on the model’s architecture. From the perspective of a consumer, though, we need only understand that the model functions as a classifier, accepting as input a tokenized list of words and yielding as output the predicted probability scores for each of 64 possible emoji.
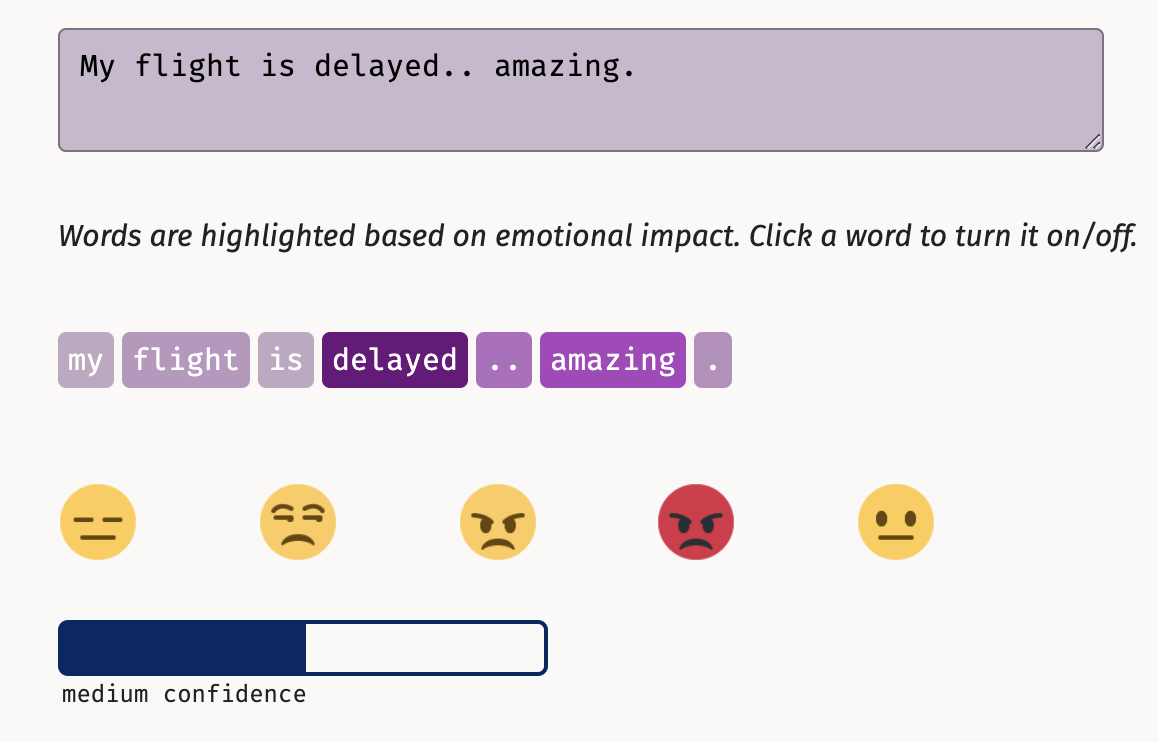
You can explore an interactive example of the model in action on the project home page
Open-source implementations for DeepMoji are provided in both Keras and PyTorch. However, as an iOS developer, I’m interested in running this model natively on-device using Core ML. For this post, we will convert the pretrained DeepMoji Keras model into a Core ML model that an iOS app can consume!
Converting Keras Model to Core ML
The DeepMoji Keras implementation that we’re interested in converting relies on Python 2 and TensorFlow 1.
Therefore, instead of locally creating a virtual environment for these legacy packages on our own system, we can simply create a notebook in Google Colab to run our model conversion code.
💡 Follow along using the completed Colab notebook for this section.
First, after cloning the DeepMoji Keras project repo and installing its dependencies, we save a copy of the pretrained Keras model.
from deepmoji.model_def import deepmoji_emojis
from deepmoji.global_variables import PRETRAINED_PATH

model = deepmoji_emojis(30, RETRAINED_PATH)
model.save("deepmoji_model.h5")
Next, to understand the model we’re working with, let’s use Netron to visualize our model, which we will see is a modified two-layer LSTM.
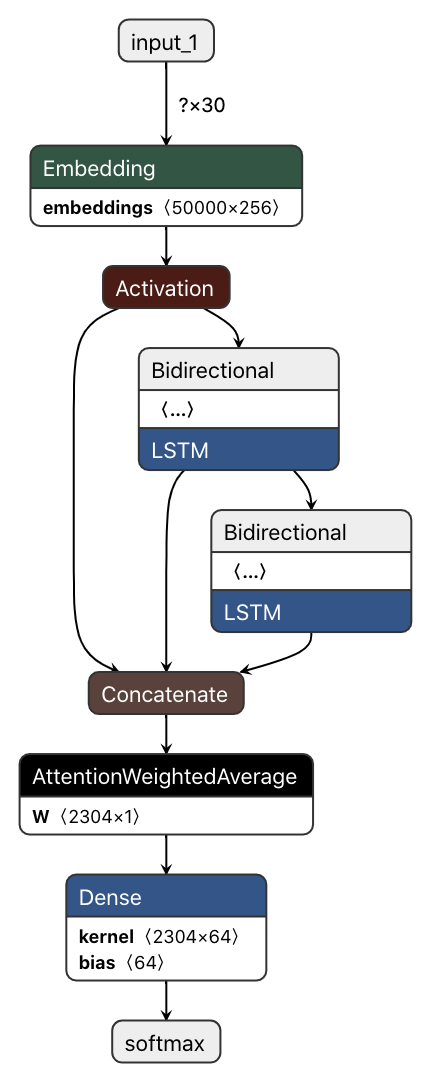
Model graph visualized using Netron
Now, let’s try to convert this neural net into Core ML format using Apple’s coremltools package:
import coremltools
from deepmoji.model_def import deepmoji_emojis
from deepmoji.global_variables import PRETRAINED_PATH

MAX_LEN = 30 # max number of words to process
model = deepmoji_emojis(MAX_LEN, PRETRAINED_PATH)

# Attempt to convert:
mlmodel = coremltools.converters.keras.convert(model,
input_names="word_embeddings",
output_names="emoji_label_probabilities",
class_labels="./data/filtering/wanted_emojis.csv")
❗️However, this results an error:
ValueError: Keras layer '<class 'deepmoji.attlayer.AttentionWeightedAverage'>' not supported.
Supporting Custom Layers
As it turns out, AttentionWeightedAverage is a custom layer so, while Core ML can see this layer’s weights, it has no insight into what actual transformation this layer is applying to its inputs. See the official Core ML Neural Network spec for a list of all supported layer types.
Let’s look back at the code behind our model, in deepMoji/attlayer.py, where AttentionWeightedAverage is defined.
class AttentionWeightedAverage(Layer):
	def __init__(self, return_attention=False, **kwargs):
		# ...
We can see that AttentionWeightedAverage is a Keras Layer subclass with a single boolean parameter, return_attention.
OK, now that we understand the specific layer the converter was complaining about, we can work around this! Core ML gives us the ability to handle custom layers if we tell the converter what to do when it encounters an unsupported layer (i.e. AttentionWeightedAverage). To do so, we must supply a “conversion function” like the following.
from coremltools.proto import NeuralNetwork_pb2

def convert_ATTN(layer):
    params = NeuralNetwork_pb2.CustomLayerParams()

    # The name of the Swift or Obj-C class that will implement this layer.
    params.className = "AttentionWeightedAverage"

    params.description = "Computes a weighted average of the different channels across timesteps."

    # Make sure to include the layer param we saw above.
    params.parameters["return_attention"].boolValue = layer.return_attention
    return params
🔨 This tells the converter that we’ll handle implementing the logic of this layer back over in Xcode-land in a class called AttentionWeightedAverage.swift.
We can now re-run the conversion code, this time specifying add_custom_layers=True and passing in a custom_conversion_functions dictionary pointing to the function we defined above.
mlmodel = coremltools.converters.keras.convert(
                model,
                input_names="word_embeddings",
                output_names="emoji_label_probabilities",
                class_labels="./data/filtering/wanted_emojis.csv",
                add_custom_layers=True,
                custom_conversion_functions={"AttentionWeightedAverage": convert_ATTN}
            )

mlmodel.save("DeepMojiModel.mlmodel")
🎉 The conversion now completes successfully! To make our model nicer to work with, we can optionally update its metadata to include more descriptive layer names.
Back to Xcode-land
Let’s drag this Core ML spec over into a new iOS project in Xcode and it should look like the following.
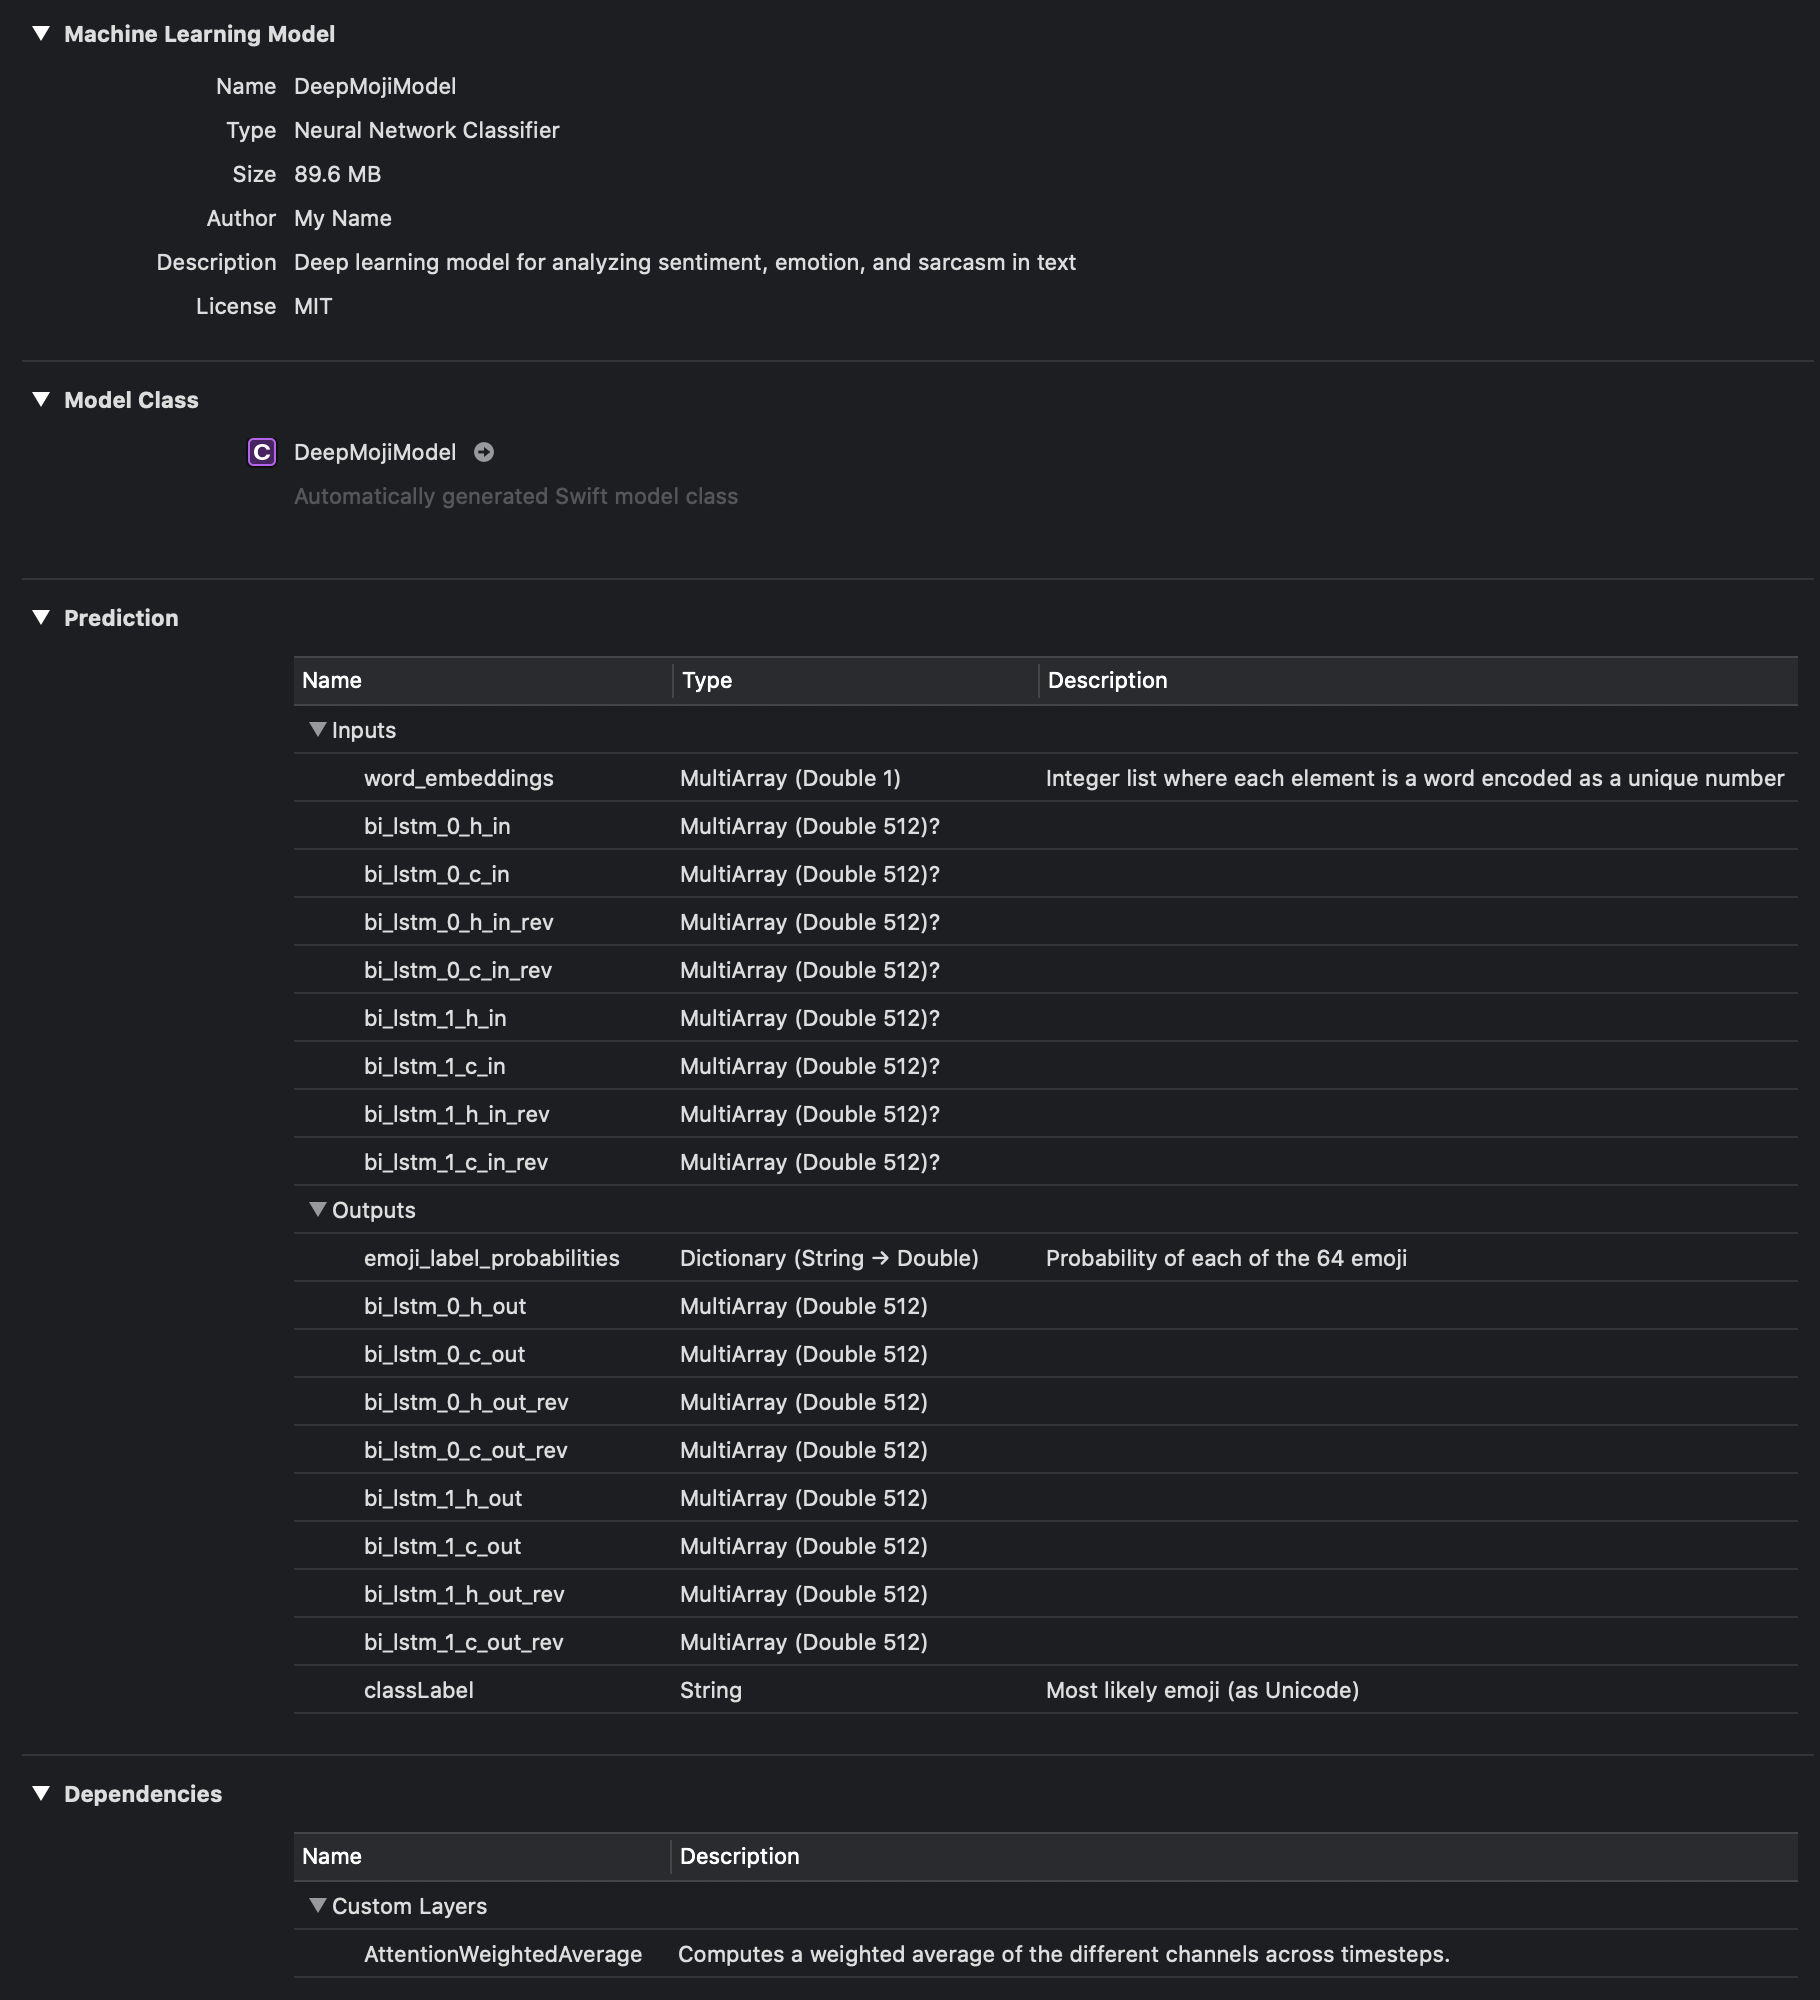
💡 Once imported into Xcode, we see extra inputs and outputs in addition to just word_embeddings and emoji_label_probabilities. These are optional, and correspond to the hidden and cell states carried across layers of the recurrent neural network. For more information, see Making Predictions with a Sequence of Inputs | Apple Developer Documentation.
This concludes part 1 of this series. Part 2 is coming soon, which will cover implementing the custom layer AttentionWeightedLayer as a Swift MLCustomLayer subclass as well as the fun part: running inferences directly against user-provided text within an app! 📱
Stay tuned! 👍
⚠️ UPDATE as of coremltools version 3.3:
The input layer to our network (word_embeddings) loses its shape after passing through the Keras -> Core ML converter. We would expect its type to show as MultiArray (Float32 1 x 30) instead of MultiArray (Float32 1) so that we can pass in up to 30 words at once, instead of one word at a time.
This appears to be a bug in coremltools, and an issue has been filed on GitHub.